Thursday, October 27, 2011

Another Christmas Idea!

Morning!  It is very hard for me not to have Christmas on the brain these days.  Since I was a kid, it has always been my favorite time of year.  I was buggin my mom the week of Thanksgiving about how soon after we would decorate and put up the tree!  I love, love, love everything about it.  Due to my ever growing cost of living and my ever shinking budget, I'm going to make a lot of my gifts this year.  Here's idea #2...

Found this on the amazing Pinterest and am now following this lovely blog...
http://laurathoughts81.blogspot.com/2011/03/make-up-magnet-board.html

A magnetic make up board! Here's the finished product...


Be on the lookout for the outcomes of my Homemade Christmas 2011 projects!  This one is a definate on my list!  Which one of you lovelies will get it???  That's only for me and Santa to know!!!

Have a great Thursday!

Thursday, October 20, 2011

Yummy dip alert!

Good morning!  Today is my Friday so it really is a good morning!  :)  I found this dip recipe on my newest obsession, Pinterest!  I made it last week for my family and I think it was gone in 2.8 seconds. I can't really tell you from personal experience if it's yummy because I was making dinner while everyone else ate the dip! But from how fast it went and how everyone raved, I think it's worth sharing and making again (and again!).

It's from Plain Chicken's blog and it's awesome.  With the holidays, it's definately an easy fix that your guests will love!  Here's the link and be sure to check out her blog, she has great recipies. http://www.plainchicken.com/2008/07/chili-cheese-dip_22.html

And here's the recipe in case the link ever has any trouble...

Cheddar Bacon Dip - Crack


This is a favorite at our tailgating parties. It is very simple to make and it addictive to eat. We refer to it as CRACK!


Cheddar Bacon Dip (a.k.a Crack)

16 oz sour cream
1 packet Ranch dressing mix
3 oz bacon bits (in the bag not jar)
1 cup shredded cheddar cheese

Mix together and refrigerate 24 hours. Serve with chips and/or veggies.
I served it with potato chips, tortilla chips and pretzels.  Enjoy!
 

Tuesday, October 18, 2011

My next project!

I've been wanting an upholstered headboard for sooo long.  I've priced them in just about every store I go into.  The cheapest I have found is $200 at World Market.  I KNOW I can make one that I will love so much more just becuase I made it!  So I found this site and I'm going to try it.  I'm not exactly sure when, but I at least have my plan of attack. I've researched online to find the right tutorial for me that I can actually do on my own. :)  And thanks to CasaSugar, I think I found it...

For some time, I'd had my eye on the Modern Velvet Headboard ($280) from Urban Outfitters, but I simply couldn't bring myself to spend $315, including shipping, on the thing. I'm not quite pleased with the quality of UO's materials (particularly the velvet they use), and since the headboard would be mostly just a decorative piece, it didn't seem like a sensible purchase. So what's a girl to do? DIY it of course!
It didn't seem like it would be a difficult project, and building my nailhead trim headboard myself would allow me to choose exactly the fabric I wanted, in addition to saving a bundle. So off to Home Depot and the fabric store I went! I picked a greenish gray German velvet to bring some contrast to my light bedding.
Here's are the supplies you'll need:
  • Piece of 1/2-inch plywood cut to the width of your bed frame and desired height (54"w for full, 60"w queen, 34"h). $17
  • 1/2-inch foam to cover surface area of one side of the plywood (i.e. 54" x 34", etc). $2.50
  • 3 yards of 54" batting. A queen-size bag will do. $11
  • Staple gun and staples. Borrowed
  • 2-3 yards of fabric. (I bought 3 yds. and have some to spare, so 2 yds. will probably do.) $24
  • French Natural Nailhead Trim — available at Joann's Fabrics, eBay seller nails-to-you ($8.50), DIY Upholstery Supply ($15). $8.50
  • Hammer or rubber mallet. Owned
Total Cost: $63!
Now, onto the steps . . .
  1. Head to Home Depot and have them cut your piece of plywood to size. They'll do it for free. If you want to screw your headboard directly into your bed, rather than hang it from the wall, you may want to have them cut you legs from the scrap plywood.
  2. Lay your plywood on the floor. Lay the foam on top of the plywood and staple it down, just in the four corners. If it's not a perfect shape, you may need to cut smaller pieces from the roll of foam and arrange them to fit.
  3. Unroll your batting and stretch it out flat across the floor. If it's already folded in two layers, leave it like that, you'll want two layers. Center the plywood, foam side down, on top of the batting, making sure there's room to fold the batting onto the backside of the plywood.
  4. Begin stapling the batting to the back side of the plywood, pulling it tautly as you go. When you reach the corners, fold them nicely like you would a present. Continue all the way around.
  5. Make sure your fabric is ironed or steamed if it has wrinkles.
  6. Lay your fabric on the floor, front side down. Lay the plywood down on top of it, foam/batting side down, with at least two or three inches of fabric around the edges of the plywood all the way around. Cut off excess fabric if needed.
  7. Begin stapling your fabric to the backside of the plywood, pulling it tautly as you go. When you reach the corners, be extra careful to fold them neatly like a present.
  8. Next up: the nailhead trim! The nailhead trim is basically a strip of nailhead that you only have to nail in every fifth nail. This saves a lot of time and makes lining up the nails a cinch. Decide what pattern you're going to go with ahead of time. I chose two rows of trim, but you could easily go with one, or even get more complicated. I wrapped my hammer in a sock so it wouldn't scratch the nailhead, but a rubber mallet will also work.
  9. Start at the bottom and begin nailing in the trim, checking to make sure it's a straight line as you go. When you get the corners, you may have to snip off some of the trim, and hammer in real nailheads depending on the length and width you're going for. Repeat as necessary until you've completed the trim.
  10. Fini! If you're going to hang your headboard, I'd recommend screwing in two heavy duty D-ring picture hangers into the back of the headboard, and hanging them from a screw or hook on your wall. If you want to attach the headboard to your bed, you can screw plywood legs to the headboard and them bolt them to your bed frame.
Wish me luck! :)

Wednesday, October 12, 2011

Great Christmas gift idea!

Morning!  Found this on a great blog and love it!  Would be great for a Christmas gift or a great project for your own home.

http://thehappyhousewife.com/home-management/homemade-chalkboard-frame/

Homemade Chalkboard Frame

Sunday, October 9, 2011

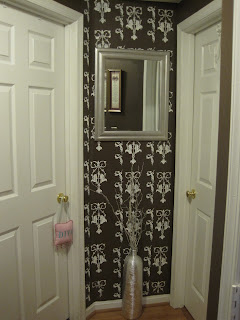
With a $5 stencil from Michaels and a few items I repurposed from other rooms, I created a fabulous focal point to an otherwise boring hallway!

I got this one from a Pinterest post, but it was super easy with some scrapbook paper and a fabulous invention called Mod Podge.

I got this sidetable for $30 from the Salvation Army.  Sprayed it with some turquoise paint and voila!  See below for how I did the top.  And P.S. the lamp is from Hobby Lobby, 50% off that I could not pass up!

I was on a Mod Podge kick this weekend and decided to use some spray adhesive to adhere pages of scrapbook paper to the top and then Mod Podged the top of it.  I think it turned out great and really original!

Here's my new wall.  The stars I had, I spray painted one the perfect shade of green I've been looking for and the other was my Pinterest project. One of my other weekend projects was some 50% off canvases from Michael's, scrapbook paper and Mod Podge (again!), they turned out great I think. Next project... see below.

A modified Pinterst project.  I had the frame made from moulding from Home Depot.  I spray painted it the same fabulous green as the star.  The wire is just plain hanging wire used to hand large pictures, that I hot glued to the frame.  Here's my input... I used a piece of an old white, linen shower curtain and hand painted grey circles.  (I like the circles aren't perfect and are homemade.)  Then with some dollar store clothes pins, I picked out some special family pictures and clipped them to the wire.

Weekend projects

The creative juices were flowing this weekend.  Got some fabulous ideas from Pinterest... have you been to this site yet?  It's amazing and addictive and will totally waste an hour of your day before you know it!  http://www.pinterest.com/ You can check out my boards at http://pinterest.com/lovepink1/.  So anyways, got some great ideas from there and even had a few of my own. :)